skip to main |
skip to sidebar
 So. I am allergic to fresh Christmas trees. For over 40 years they were no problem, and then we bought one home this year and I couldn't be in the same room with it. I tried, I really did. It was finally banished to the patio when Tyler developed a serious sinus headache and I suspected he was allergic, too. We really wanted a tree so that we had somewhere to put presents besides a pile in the corner, but a store-bought artificial tree didn't appeal to any of us.
I had to think of something quickly. I bought two sets of nesting wood rings from Wallter, painted them green, and and hung them from a wood star with ribbon. I'd still like to decorate it with beads, but there isn't time this year, so I'll write about this again next year, early in November. I'll include detailed instructions then.Merry Christmas!
This is cross-posted on the Generation Vibe forums. Pictures by Tyler.
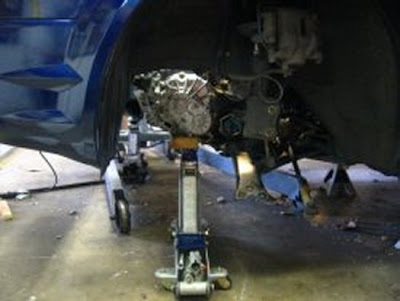
After reading many incomplete strings on how to change the clutch I decided to try it on my own and write about it. It was really not has hard as I thought it would be, but I would not recommend this procedure if this is the first time you have ever done a clutch change on anything. You do not have to remove the engine to do this job, or have any special Toyota tools. You do need to support the engine as 3 of the motor mounts attach to the transmission and they need to be removed to pull the transmission. There will be only one engine motor mount attached when you pull the tranny out. Note that I did this job by myself. It would go much easier if you have a helper. The writer takes no responsibility for a damages or personal injury resulting from using these instructions. Now that that legalese is out of the way let’s get after it….
1. Remove the hood. Be sure and mark the hood hinge where it meets the hood so that you can reinstall it in the correct position later.

2. Jack up the car and support it with jack stands. Remove the front wheels.
3. Remove from the engine the plastic cam box cover.

4. The 2ZZ engine does not have a front engine lifting eye from the factory. I guess they had to remove it in order for the cool engine cover to fit. I took the one off the back of the engine and bolted it to the provided spot on the left front corner of the engine head. You will see an empty threaded hole right above the alternator. You have to use this lift eye because it is the only one that will fit. The one I stole off my 96 Miata would not fit here so I put it on the rear of the engine. If you don’t have a Miata available go hit the junkyard.

5. Remove the battery, tray and support.

6. Remove the driver side splash shield from under the car. Toss the cruddy plastic clips that hold it on. Use some proper 6mm bolts to attach it later.
7. Remove the 2 screws holding the vacuum control relay on the front of the air cleaner lid.
8. Unplug all the connectors to the air cleaner lid.

9. Remove air cleaner to throttle body hose.
10. Pull off the other vacuum control relay from the back of the air cleaner lid. There is a small vacuum accumulation chamber on the back of the lid. Be very careful and pull off the vacuum hose from the nipple. I ended up breaking the nipple off when I did it. I just plugged off the hose, it did not seem to make any difference in how the car ran later. I’ll fix it right one day.
11. There are several brackets that hold the various hoses, wires, etc in the engine compartment. Remove them and be sure and mark where they go for later reference. Remove the air cleaner bottom.
12. Disconnect slave cylinder and brackets. There is no need to break the hydraulic connection. Just set it aside by the firewall.


13. Remove shifter brackets top and rear of transmission.

14. Attach hoist to engine. I used a several feet of VERY HEAVY nylon rope to do this. Be very careful!!!

15. Remove the starter. One of the bolts is on the bell housing/transmission side.

16. Remove the left front brake caliper and wire it out of the way. Remove the brake disk. Remove the bolt that attaches the ABS sensor to the hub. Wire it out of the way.
17. I was told that I would have to remove the 30mm nut from the axle end, but in the end I could not get it off with the cruddy air impact gun I had. Turned out I did not have to remove it anyway, more on that later.
18. Disconnect tie rod from end of steering knuckle.
19. Remove the bolts on the strut and pull them out completely.
20. Remove the 3 bolts attaching the lower suspension arm to the steering knuckle.
21. Pull the entire steering knuckle and axle shaft completely out of the transmission. Give it a good tug, it’ll come out. Unfortunately my CV joint separated and only the axle part came out. The stub remained in the transmission. No biggie as it turns out. Note that I did not have to remove the passenger side drive axle. When I pulled the transmission off the engine it slipped right off. There is no snap ring retaining it in the transmission.
22. Make sure the motor is well supported by the motor lift and pull out all of the bell housing bolts. There are (2) 17mm bolts on the top, trans side and (4) 14mm bolts on the sides on the motor side.
23. Remove the bolts and nuts on the cross member under the engine. Remove all motor mount bolts, front, side and rear.
24. Make sure one last time that no cables or wires are attached to the transmission. Use a large flat screw driver and start prying the bell housing away from the engine. When it breaks free place a couple of floor jacks under it to support it.
25. The transmission should slide off the engine pretty easy at this point. Be very careful as you lower it to the ground. It weighs 87 lbs. I got scared for a second when the transmission came off the engine and tried to slide off the jack. It turned out ok as I was able to manhandle it to the ground.


26. Pull the tranny away from the car and clean it up. Pay particular attention to the area where the release bearing slides on the input shaft cover. I saw a lot of rubbing here from insufficient lubrication. Use hi-temp grease on all pivot and slide points of the release lever. Of course always use a new release bearing. I was surprised to find no transmission pilot bearing on this engine. Cost cutting move???

27. Remove pressure plate and clutch disk. Note fried flywheel. Get it surfaced even if it looks good. It only cost me $35.00. This clutch had 60K miles of easy driving. It really started to go south at 45K we just milked it for a while.
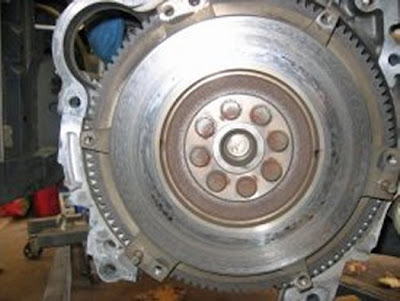

28. Use a 10mm-1.25 tap and clean out all of the threads on the flywheel mounting holes. They will be full of thread locker from the old bolts.
29. Install the flywheel with new mount bolts. The Toyota part number is 90910-02103. There are 8 of them. Torque in a star pattern in three passes until you get to 35 lb/ft.
30. Install new clutch disk and pressure plate. I strongly recommend an RPS or ACT clutch here. Do not use the stock clutch, especially on the 2ZZ (GT/XRS) engine. It is not adequate for the job in my opinion. Since I could not find a clutch disk centering tool, I did the best I could to center the disk. This turned out to be a real problem later. Find the tool if you can!

31. Install the 6 pressure plate bolts and torque to 14 lb/ft. I used locktite on the threads.
32. Now the fun part begins. Installing the transmission on the engine. I tried to support the transmission on a floor jack and jack it up into position to stab it on the engine. It did not work because there is no flat area on the bottom of the transmission to balance it on the jack. I ended up laying the tranny on the floor of the garage under the car. While standing on top of the engine with one foot on the exhaust manifold and the other on the engine lift I reached down under the engine a grabbed the transmission and lifted it up onto the engine. It took me 4 tries to stab it on the engine but I finally got it. Note: I am only writing this for informational purposes only. Please get help to stab the transmission on the engine. It is a two person job. I did it alone because I was desperate.

33. When you get tranny on the engine, start the two 17 mm bolts on the top of the bell housing first, and then start the other six 14 mm bolts on the side of the bell housing. At this point I realized how important the clutch disk alignment tool is as the tranny would not go all the way into the engine no matter what I did. I ended up bolting it together as far as it would go, and then I pried on the clutch release lever with a big screw driver. I was able to release the pressure plate enough to allow the clutch disk to center itself and allow the tranny to slide all the way in.
34. Tighten all of the bell housing bolts. Note that the passenger side drive axle just slid right into the tranny with no problem. I put a dab of grease on before I mounted the transmission.
The rest of this is basically reverse assembly of everything. Now is also a good time to clean the shifter cable bell crank and pivot eyes and giving them a good greasing. I found the best grease for this is C105 Lubriplate assembly grease. Don’t use too much of it as it will attract dirt and dust. Do not grease the plastic piece on the linkage. It makes the shifting worse not better. It tried it.

Put it all together and take a spin. The RPS Sport/Max clutch is awesome compared to the stock unit. There is hardly any increase in pedal pressure. Take up is much better that the stock clutch. Take it easy on the clutch for at least 1000 miles and let it break in. Good luck!
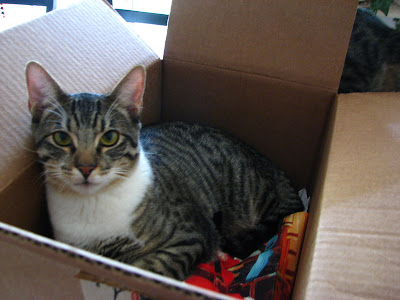 Thursday evening I was doing what a lot of people were - wrapping and packing Christmas presents to ship to relatives. After I chased all the cats out of the boxes and started putting things away, I found three pairs of scissors on the table. I had taken out one pair for the wrapping paper, another pair for the shipping labels, and the third pair for the packing tape. We have scissors!
The next night, the three of us were at a restaurant and talking about the projects we had going on. I was planning to make a Christmas tree made from wooden rings, ribbon and beads, Tyler wanted to paint a bicycle frame with chalkboard paint, and Jim was looking for a place to upload some photos to support an automotive tutorial he wrote a while back. I told Jim that a blog would be the perfect place to upload the photos to, and then it came to all of us: we could share a blog for our projects.
Here it is.And here are our scissors.


